

Learn using the step-by-step guide how to install TWRP custom recovery on your Samsung Galaxy including Galaxy S7 /S7 Edge, S6 /S6, S5, S4 Edge, Note 5, Note 4, Note 3 and other Galaxy Tab devices.
What is TWRP?
If you have never installed and it is your first time, then it is a good idea to learn more about TWRP, what it does and how to get most out of it.
Team Win Recovery Project, is open-source custom recovery for Android devices including Samsung, LG, Sony, HTC, OnePlus, etc. Unlike its CWM, TWRP has touchscreen interface making it easier for users to flash Custom ROM, kernel mods and Gapps. As compare to stock recovery you can also perform other tasks such as wiping cache (dalvik) , Nadroid backup (entire rom backup), restoring and mounting various device partitions including system, boot, userdata, cache and internal storage are supported.
Here is how to install:
What is TWRP?
If you have never installed and it is your first time, then it is a good idea to learn more about TWRP, what it does and how to get most out of it.
Team Win Recovery Project, is open-source custom recovery for Android devices including Samsung, LG, Sony, HTC, OnePlus, etc. Unlike its CWM, TWRP has touchscreen interface making it easier for users to flash Custom ROM, kernel mods and Gapps. As compare to stock recovery you can also perform other tasks such as wiping cache (dalvik) , Nadroid backup (entire rom backup), restoring and mounting various device partitions including system, boot, userdata, cache and internal storage are supported.
TWRP Installation Guide for Samsung Galaxy:
You can easily install TWRP recovery using Odin on any of the Samsung Galaxy device including the S, Note, J, A and Tab Series. Please note that when using Odin, root access is not compulsory, you can flash TWRP without having root access on your device.Here is how to install:
- First of download Odin and install USB drivers on PC.
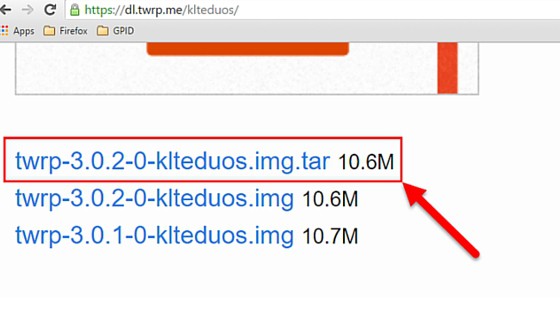
- Go to official twrp site and download img.tar recovery image for your device as you can see in the screen below:
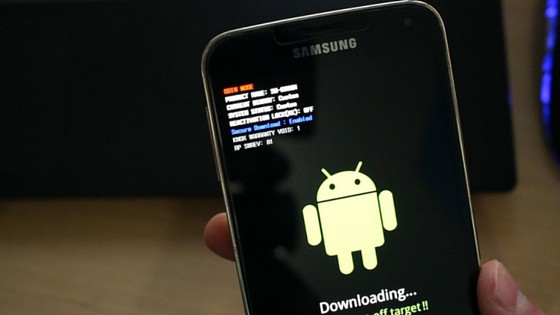
- Now turn off your phone and reboot into download mode by pressing and holding the Vol down+Home+Power keys simultaneously for about 4 to 5 secs. Press Vol up to continue.
Download Mode screen on Samsung Galaxy S5 Credit: Naldo Tech
- Run Odin3 application as an Administrator on your PC.
- While in download mode, connect your device to PC using USB cable.
- Make sure your device is connected and odin recognizes it and go with default settings.
- Hit the AP/PDA button in Odin and select the recovery image file that you’ve downloaded earlier.
- Wait for Odin to check the file and then hit START button to start the flashing process.
- It should not take more than 2 minutes but depends on your PC.
- Once done, your phone will automatically reboots and Odin3 should show PASS! green labelled message.

কোন মন্তব্য নেই:
একটি মন্তব্য পোস্ট করুন