Ever since the Apple event, people are holding back their millions of
questions about the new phones and tech introduced but what’s really
been the hot topic is the iPhone X. As we have seen, the iPhone X sports
an edge-to-edge display and Apple has removed its classic circular home
button. This obviously begs the question “How I can take a screenshot
on iPhone X if it doesn’t have a Home button? “ We have the answers!

Screenshots are a vital feature of every smartphone as they allow sharing moments from your favorite videos, moments on the game, conversations on social networks like Twitter or Facebook (well, that’s sometimes not the best thing for those in trouble), bugs that you have to report and almost everything you see on your screen. Traditionally, the method that was implemented was clicking on both the Home and Power buttons. But with the introduction of the iPhone X, the Home button has been abandoned. So, how does one go about the process of capturing the screen now?

You will witness the screen flashing white and hear the camera shutter sound (that is, if the sound has been enabled).

These were the simple steps on how to screenshot on iPhone X.
The iOS 11 has come with a couple of updates and one of them is allowing you to give a preview of the screenshot. You can also edit the screenshot before it has disappeared and use the markup tools without any third-party app.
If the case arises where you have to edit, or, perhaps see the captured screenshot then you must navigate to the camera roll after which you will scroll down and find the captured screenshot. After coming to this step, all you have to do now is to select either the edit option or whichever one you prefer and you are free to alter it as you desire and share on whichever medium it is required for whether that be WhatsApp, Facebook, Email etc.
This was just a basic tutorial on how to get to the editing part. However, there are a lot of other options available to you such as adding text, applying a filter or adding anything you like to the screenshot. It can be deduced that the method of editing is somewhat different nevertheless the steps are the same for taking a screenshot or Print Screen.
We hope this helps you out and you’re well aware beforehand on how to take a screenshot on iPhone X!

Screenshots are a vital feature of every smartphone as they allow sharing moments from your favorite videos, moments on the game, conversations on social networks like Twitter or Facebook (well, that’s sometimes not the best thing for those in trouble), bugs that you have to report and almost everything you see on your screen. Traditionally, the method that was implemented was clicking on both the Home and Power buttons. But with the introduction of the iPhone X, the Home button has been abandoned. So, how does one go about the process of capturing the screen now?
1. How to Take a Screenshot on iPhone X
- Open the page or screen you want to capture.
- Make sure everything is the way you want it for the shot.
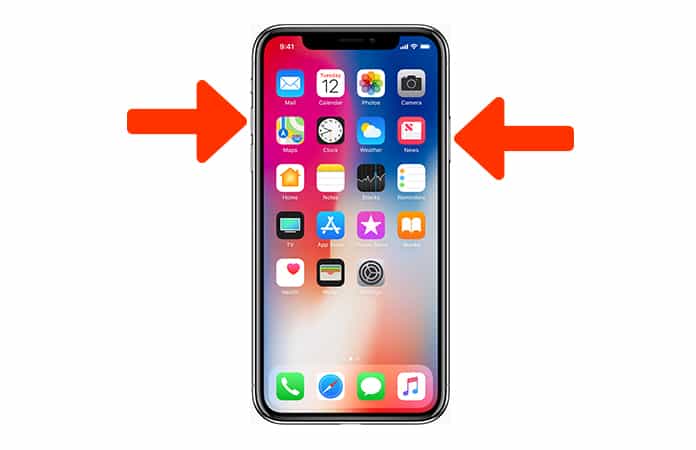
- Press and hold the Power button that is present on the right side.
- Click the Volume Up button along with the Power button at the same time. (As you can see, this has replaced the Home button step from previous iPhone).

You will witness the screen flashing white and hear the camera shutter sound (that is, if the sound has been enabled).
2. How to Screenshot on iPhone X with Assistive Touch
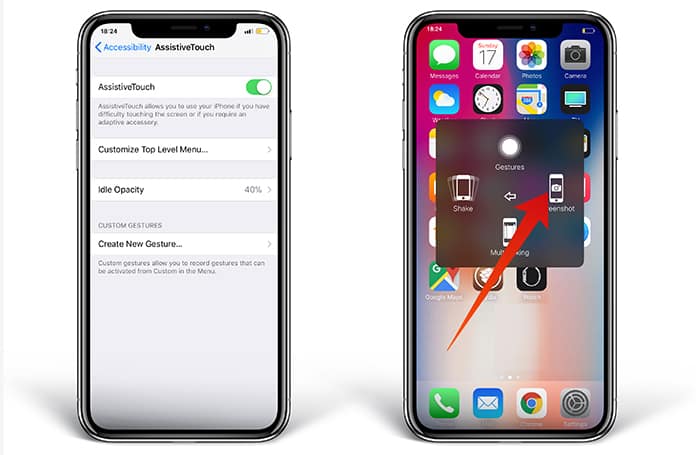
- Use Assistive touch.
- Go to the Settings App on iPhone X.
- Click on General > Accessibility and Assistive touch.
- Now tap on the Assistive touch icon and tap on the Screenshot option.

These were the simple steps on how to screenshot on iPhone X.
The iOS 11 has come with a couple of updates and one of them is allowing you to give a preview of the screenshot. You can also edit the screenshot before it has disappeared and use the markup tools without any third-party app.
If the case arises where you have to edit, or, perhaps see the captured screenshot then you must navigate to the camera roll after which you will scroll down and find the captured screenshot. After coming to this step, all you have to do now is to select either the edit option or whichever one you prefer and you are free to alter it as you desire and share on whichever medium it is required for whether that be WhatsApp, Facebook, Email etc.
This was just a basic tutorial on how to get to the editing part. However, there are a lot of other options available to you such as adding text, applying a filter or adding anything you like to the screenshot. It can be deduced that the method of editing is somewhat different nevertheless the steps are the same for taking a screenshot or Print Screen.
We hope this helps you out and you’re well aware beforehand on how to take a screenshot on iPhone X!


কোন মন্তব্য নেই:
একটি মন্তব্য পোস্ট করুন