How to Find and Remove Duplicates in iTunes
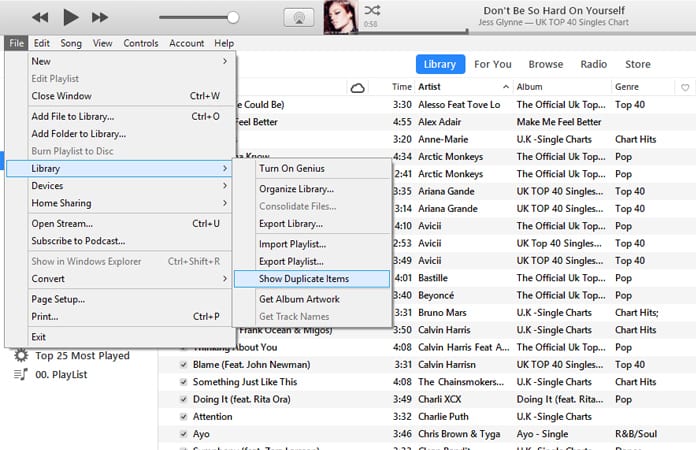
The new version of iTunes makes finding duplicate files pretty tough. You could find and remove duplicates in iTunes by just directing yourself to this option View > Show Duplicates. Here are the steps to finding and removing duplicates in iTunes 12.x:
- Open the iTunes app.
- Click on File > My Library > Show Duplicates.
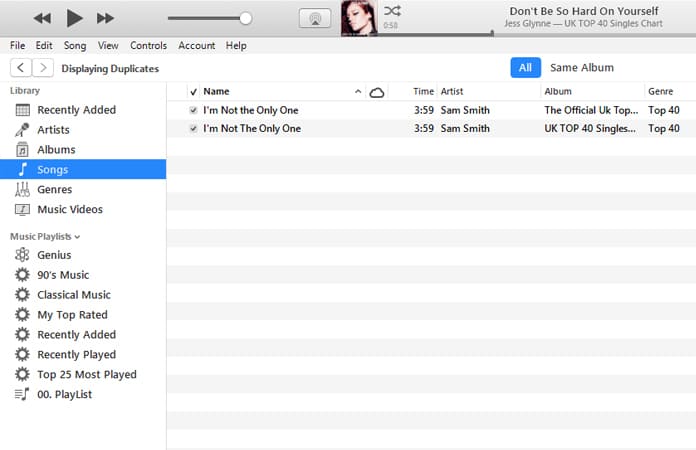
- Click on ‘All’ to view the duplicate track listing, click ‘Same Album’ to show duplicated songs from a specific album.
- It is a good idea to arrange the iTunes music columns so you can view Name, Artist, and Album by Artist. You can ensure that these columns are displayed by holding down the Control key and clicking on the columns and check that Album and Artist have a tick next to them (Name constantly appears in iTunes).
- Click on the Name column in iTunes: you’ll be able to view duplicate files next to each other.

The iTunes display will now only show duplicated tracks. It uses matches based on the same Song and Artist so you’ll be able to see multiple versions of the same song from different albums. So if you have a studio and a live version of the track you may end up looking at different versions of the same song.
You can now remove duplicates in iTunes and as many of them as you want. You have to, however, make sure that you move these files to Trash because any other option like keep files would not be beneficial.
When you’re done with this, click Done in the top right-hand corner to return to your normal iTunes view mode. You will now see your entire iTunes library free from duplicated tracks.
How to Prevent iTunes From Importing Duplicated Music
If you drag and drop your music in iTunes it will not import the duplicate audio files to the library. But if you insist on copying the duplicate file to library. Then you can press the Options key (MAC) or Alt key (PC) to force duplicate song in iTunes. Hence, you should no longer need to adjust anything.These steps will help you to remove duplicates in iTunes and organize your library:

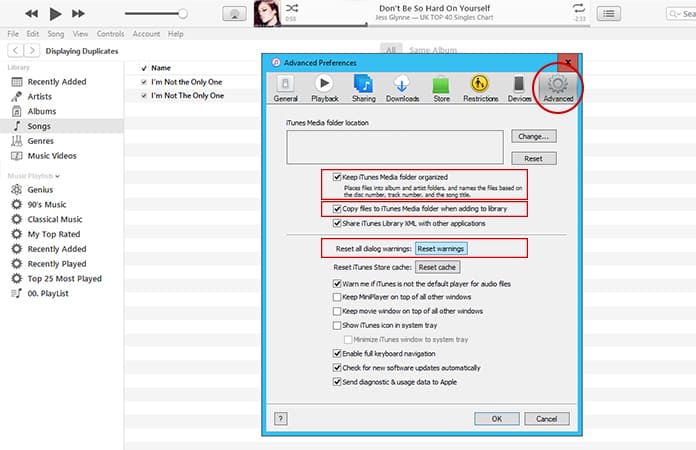
- Click on iTunes > Preferences.
- Click Advanced.
- Ensure that the Keep iTunes Media folder organized box had a tick in it.
- Ensure that the Copy files to iTunes Media Folder when adding to Library has a tick in it.
- Click Reset all dialog warnings.
- Click OK.


কোন মন্তব্য নেই:
একটি মন্তব্য পোস্ট করুন